The Earth Oven
We were woefully unprepared when we lost our well for four days. Bob made it home and we started dragging all 400 feet of pipe and rope out of the well and onto the field, a process that took almost 4 hours. Fixing the wiring was Bob’s job, and that took the rest of the weekend.
The only think I could think to do was cook. But I wanted a new oven.
I’d seen cob ovens in books and on websites. The ultimate in green chefing, earth ovens are new rage for an old method of doing things – this is not unlike the rest of things Sustainable and Green. We’ve started building with straw bales – just like folks a hundred years ago. (And by “we” I so far mean other people. Bob and I haven’t gotten it together to enough to do anything but cheerlead for the Green Team of tree hugging sustainability leaders that we admire.) We’ve begun to use green roofs on our houses and our commercial buildings – Google “green roof” and see what kinds of ancient things you find.

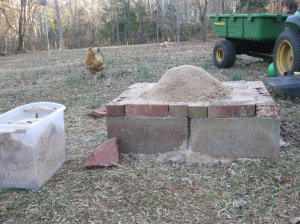
We started with a sand pile on a questionably built foundation. Even that would turn out okay in the end.
Anyway, I’d wanted an oven like that since I saw Angelina make pizzas in the one over at the community college. Then I read that someone did it in a day. All you needed was dirt (there is a science to the dirt, and living in the South we definitely have out share of what we needed clay-wise), sand, straw, and water. Water. We didn’t have much, but come on – we had to eat, right? I could hear Bob calling me from the well where he was towing up the 390 feet of pipe and pump.
I enlisted Georgia’s help. As it turns out, this is a perfect activity for a 4 year old, they honestly cannot mess it up. We chose the spot and made the mud and worked all day long patting and shaping and building the oven. I consulted Kiko Denzer’s book several times, got lots of mud on it, and by the end of the day we were done.
There’s probably a time in the future when I will chronicle exactly how we completed each step. First, though, I have to record each step. Last week I worked so blindly that I have no idea what kind of mix I used – I do know where I dug to get it – and I don’t think I could repeat it. The pictures will show you how things kind of went.
We got the sand from the girls’ sand box – I’ve decided that replacing the sand each year is going to be the thing to do, anyway. I like for our sand box to look like a day at the beach – a clean, white beach. I rake it during the summer and pick out the leaves, but when colder weather comes things get nasty in there. The decision to use the sand for spring projects and replace it every year after we use last year’s supply keeps me from freaking out during the winter about the chickens picking through it, or the little seeds that fall from the Crepe Myrtle that are impossible to rake up. Or whatever else decides that our sandbox is the place to be and the place to pee.

Cover the sand pile with plastic, and secure the plastic. We used bricks. When you start mudding, you don’t want to mud on top of the plastic, so kind of shove it out of the way as you go…
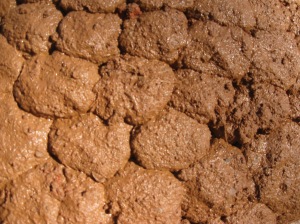
The next layer is dirt and sand and water. You should be able to form a ball with your mixture, and have the compacted ball not dent or go splat when you drop it on the ground. I didn’t read that part of the instructions and our clay balls absolutely went splat when we dropped them; in fact, we were having such a good time stacking them and smearing them that I wondered why we didn’t just put globs of clay on the sand form, why bother with the balls? I found out there is structural sense to the no-denting ball thing, but again – it worked out. Case in point, it’s pouring down rain right now, and our oven sits uncovered and strong as ever, even with its dented, sloppy balls.
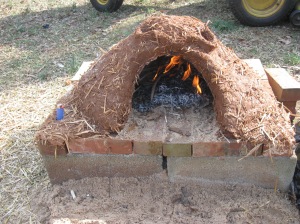
After the mud-sand-water layer comes the real cob, which should be a little clay, but mostly sand and straw. Just enough clay to hold the mix together. This should require tons of smearing the clay into the straw and sand, but I was working with a small kid and a husband that needed my assistance every two seconds on the well project, so dedicated straw smearing was not an option. I did the best I could and then Georgia and I started piling it on, in glops this time. Once it was done I was even able to fashion a dragon head out of the rest of the clay and straw, and prepared to see the whole thing crack up and fall over. My neighbor Dudley says it looks like a chicken, and I guess once I saw it his way he’s kind of right.
After the cob layer was done I was supposed to wait a day and cut the hole for the door, at which point you sweep the sand out and unpeel the plastic from the shell. I waited about 2 hours, then couldn’t take it any more. I cut the door, expecting a collapse. When none came and the door was out, I started in on the sand. My husband walked up behind me and yelled, scaring me to death. “What are you doing! You’re going to ruin it!”
I know, but I literally cannot help myself.
It worked, la la, the sand came out and the oven stayed standing.
Wait about a week for it to dry, the directions say, two weeks in some areas.
I’ll build a fire tonight, I thought. If it cracks, so what? We’ll build another one and I’ll have Experience under my belt. Mistakes are wise things.
The fire was a success. The whole thing dried out and didn’t come apart in a torrential downpour about 2 days later. I’m not saying this is the right way to do this, it’s definitely the do-it-quick method, and I’d never get results like Kiko Denzer with this kind of earth building routine. Diving in did let me do something that many tell me they’ve been meaning to do for a while, though, and earth oven building is the kind of work that is forgiving enough to try it now, today. Even if you think you can’t follow instructions, or that you might do something wrong, try it anyhow – it will probably be fine. People have done it for millions of years and at least some of them had to be marginally inept. Don’t let a lack of materials or a remedial engineering sense or inattention to detail stop you from trying. I employ a strict initial exuberance that wanes into impatience and loss of focus in almost all of my outdoor projects.
My tenacious husband fixes the rest of them for me.
In the end – the next day being the end – we actually baked a loaf of bread in this oven. I do bake bread every day (it’s not what you might think, see The Bread Policy.)
Want to read the article I read in Mother Earth News? Here is that link:
http://www.motherearthnews.com/Do-It-Yourself/2002-10-01/Build-Your-Own-Wood-Fired-Earth-Oven.aspx


Awesome! And the bread sounds yummy, too!